


I've been reading up on current SEO as a refresher course for myself. Many years ago, I would fervently study up on the subject, even though I had no time to implement it. Today, I have time and the gusto to pursue this. Gotta monetize this blog with SEO! (Search Engine Optimization)
So to begin with, I signed up with Shareaholic to add sharing buttons to my site.
What are sharing buttons?
The buttons that you click on when you wanna share an article, or a funny image or animated gif. For example, you click on a Google Plus button on an article, and presto chango! It posts the link directly to your Google Plus profile. (provided you're already logged in to your Google Plus profile as you are doing this) So that all your friends on Google Plus can see how interesting it is.It helps your information go viral all over the internet much faster than you can market it yourself. Letting other people share it is super helpful and faster.
Now, my free template already came with pre-loaded share buttons.
So why bother changing them, if my free blog template already supplies them? (see image below)

Because the ones that came already built-in with this free template, were put there by the dude who constructed that template. These particular buttons are supplied by Add This! In case you didn't know, every time those sharing buttons are clicked on, the author gets paid money. So in this case, this author is getting paid with his free template that he gives away for free. Despite that this blog is displaying my name, my web address and my personal blog posts, he gets paid every time one of you clicks on a share button.
Well screw that! I want the money! It's my blog, after all!
So I just change it. After all, the template is customizable.
How to add sharing buttons
So this is what we have now:
Forget whatever you see in your personal Shareaholic settings or you'll just get confused. Go directly to this page:
http://support.shareaholic.com/hc/en-us/categories/200102423-Getting-Started
**NOTE!** Before you continue, if you have privacy plugins, please go into each one and Whitelist the Shareaholic site. Otherwise the changes will not save.
Next, pick the blogging platform you use. For myself, this is a Blogger blog, so that's the one I choose.

After it is filled correctly, this is how it should look:

Right there in the center, where you see the Get Setup Code tab, click it.
This will show up:

And so, I follow the instructions precisely. It tells me to drop in that code right before the </head> tag in my template HTML code:

The notice below the cut & paste code said the following:
Once you include the above code on onyxtowers.blogspot.com, you can make edits to your app configurations and they will be updated automatically on your website — no need to touch code again!Well that's good! I'd have to hate to fiddle with code tweaking each and every single time I need to make one little change.
So the next thing is, you gotta verify your site. This means your code changes have been acknowledged. More importantly, you can adjust your buttons on your Shareaholic account easily.
So on your Website Tools Dashboard there, click the big blue Verify Site button.

We're almost done here...
Set up Share Buttons
Now we have to add Shareaholic to the posts by setting up the Share Buttons.We now go to https://www.shareaholic.com/publisher_tools. This takes you right back to Website Publisher Tools. Scroll down the page, then click on Add App Location:


Done & done!
So from now on, if you want to add, change, or subtract particular buttons, you just sign into your Shareaholic account, go to your dashboard, go to Locations and click on the Name you gave your buttons. Then you make your changes.
Now, like I said in previous posts, all templates are different. Shareaholic gives you detailed instructions where you can find the post header within your HTML code, in order to deposit the snippet of code necessary to activate your buttons. On my particular template, all I did was find the previous Add This button code that I wanted to replace, and simply swapped it with the one Shareaholic supplied me with.
This is how I did it on my Blogger site...
I went into the HTML to edit the code. Which looks like this:

And in this mess, this is the Add This code I'm about to replace:

I need to get my code snippet. So in my Shareaholic dashboard, I go to the share buttons that I named, (or whatever Name you gave yours) and click on the '</>' icon like so.
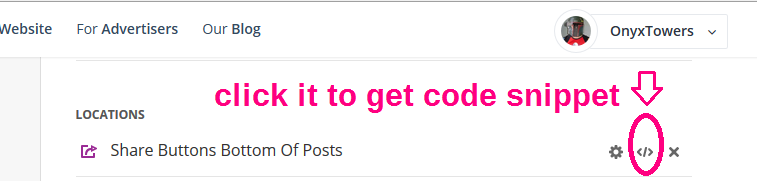
And this window pops up with the code I need.

I copy & paste it right into my Blogger HTML section of code where the Add This code used to be.
So now it looks like this:

Hit the Save button and we're done!
So!
Did it work?
Let's take a look at the before & afters:

A resounding YES! Success!
And that's it. But I should mention if you want to get paid for every click share, you need to put your Paypal email address in your Shareaholic account to link it up. That's all there is to it.
I tested it by sharing one of the blog posts to my Pinterest (log in to Pinterest first) and it worked smoothly.
